Our wandering club members, Catherine and Jack, have left Africa and are now in Madagascar. Here are their latest reports (be sure not to miss number III):
Hi Everyone,
Our direct “air-scare” flight turned into two flights in Madagascar. When we arrived at the airport we were told the schedule had changed and the flight was now going to the south and east of the country – and then on to our destination in the west. This diversion added an extra couple of hours to the trip. Anyways, after a particularly bumpy landing we did get to our destination and our patiently waiting guide. Fortunately, he had been alerted by the guide at our departure point that we’d be delayed.
The city of Tulear at the southern part of the country was reminiscent of Cochin in southern India. Narrow streets crowded with rickshaws and ox carts and people carrying large loads balanced on top of their heads. Once out of the city, and into the rural area, the brick and stone huts gave way to reed and straw huts grouped closely together in small villages which appeared out of nowhere and crowded along the edge of the road. The road was predictably a narrow strip of ashphalt “decorated” with numerous potholes at random intervals.
We stopped briefly from to time to photograph unusual scenes – such as a rum distillery (using tamarind) set up in the centre of one small village. This consisted of many 44 gallon drums with pipes going in/out and many hundreds of plastic water bottles which were used to the “age” the 80% proof white liquid. Apparently there has been more than one death caused by this stuff.
Due to the late arrival of our flight, our 4 hour drive had us driving after sunset (which was less than fun) and we arrived at our lodge after dark. The guide contacted the lodge while we were enroute to make sure that we’d still be able to get dinner when we arrived. The lodge was beautiful – set high up in the rocky landscape that makes this particular area of the country popular. The national park is large and makes good use of the sandstone and granite rocks, canyons and natural streams that flow out of the rocky mountains. There is cactus, eucalyptus, dracaena and aloe plant everywhere.
The next morning we were paired up with a licensed national park guide, and went on a hike down thru one of the canyons. The path was rough and scrambled up and down many boulder strewn channels, and wandered back and forth across the streams. As soon as we’d climbed up we’d be scrabbling back down again. Along the way we saw our first lemurs, chameleons and a boa constrictor, plus many birds. At the farthest point we arrived at two deep natural spring water pools – one bright blue, the 2nd quite black with a waterfall spilling into it. We stripped off and had a refreshing swim in the frigid water. The hike took close to 6 hours, and the young guide carried our pack with several heavy water bottles in it – as well as making sure that Cathy didn’t lose her footing when scrambling over the terrain. This was quite the challenging since we were frequently stepping thru streams on rocks placed to accommodate the jolly green giant rather than a 5ft.2in little old lady with short legs. There were also a couple of sections with tree trunks artfully placed across the water that was reminiscent of walking on a balance beam. It was not a pretty sight to watch us negotiating these obstacles.
Needless to say, when we were finally back it turned out we’d covered about 6 km. We were certainly not a pretty sight – but proud of ourselves.
The scenery was beautiful and we had a pile of fun.
Sorry, internet connection will not allow photos.
Cheers………………Cathy & Jack
and II:
Hi, Everyone
Internet access painful. I’m writing my trip diary, but can only send sporadically.
Arrived in the Ranofarama rain forest after a long but wonderful drive from Isalo National Park. We stopped along the way in the small village of Anja where the local people were convinced by their chief a number of years ago to protect the lemurs and exploit their small chunk of forest. They have set up a thriving business guiding visitors thru their area and showing the lemurs to the tourists. It is a small area the trails are not too difficult to manage, and you get to see lemurs within a few minutes of starting.
Rano is a different story. The region is mountainous and one of the few rain forests left in the country. The guide advised that the trails are very steep and slippery, with rough terrain and a lot of scrambling. With this in mind, we asked if there was something in the area a bit more manageable. He consulted with the local guides and they took us to an area that was easier for us to navigate. The tradeoff was that we did not get to see the Sifaka lemurs that inhabit the rain forest. We elected that this was OK with us – and we spent an enjoyable 3 ½ hours hiking around on the “easy trail”, which turned out to be quite challenging enough for us. We had a local guide and a spotter – and they found two different species of lemur groups, along with some unique frogs and a rare “giraffe necked beetle” which was really a weird looking creature. The “easy trail” contained quite enough rough ups & downs and bushwacking to suit us.
We had lunch in the local village and wandered around to watch the folks go about their daily routines. In the market place we came across a large sound-system being set up – and then a group of about 20 people of all ages – from toddlers to middle aged grandparents – started singing and dancing and putting on a show. We watched for about 15 minutes and asked if it was a political or religious event – and it was the latter. In the evening at dusk we were taken to a nearby area along the narrow winding park roadway for a “night walk” to look for night chameleons and tiny mouse lemurs. The guide smeared mushed up bananas on tree trunks to lure the mouse lemurs. We were a bit skeptical, but after about 40 minutes these little creatures about the size of a chipmunk started to appear. They crawled around on the tree trunks licking up the mushed banana. Cute little beasts. Our guide was also expert and scanning a flashlight over the rainforest vegetation and spotting night chameleons and pointing them out to us. This was rather amazing since some of these creatures were less than 2 inches long – and even with a flashlight beam directed on them we had a hard to seeing them.
Again, we have to repeat, the countryside is very beautiful and not at all what we had expected after watching several of the BBC documentaries about the country. We were expecting brown, arid rocky terrain stripped of everything and so far, that has not been the case.
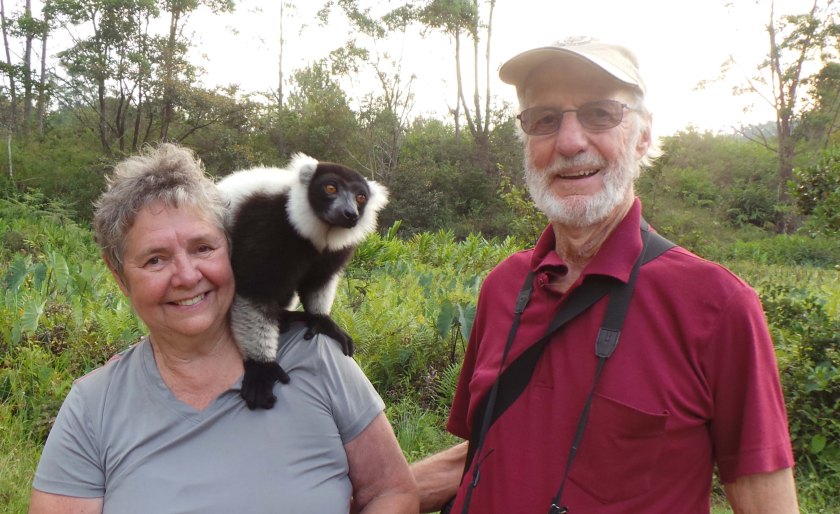
The final days of our trip are at a private lodge in the mid-eastern area of Madagascar at Perinet National Park. The lodge we are staying at has a private island where they have in residence many rescued lemurs which are completely habituated. We get to spend time on the island interacting with these guys – and it is a hoot.
We are heading back Antananarivo the capital city tomorrow, and at the end of the week we are flying back home. The distance is not too far – about 130 km — but the road is the usual mixture of narrow strips of tarmac, large potholes which our guide calls “elephant nests” and winds up and down the sides of several mountains. It will take about 4 hours – if we are lucky!
Cathy & Jack
and III:
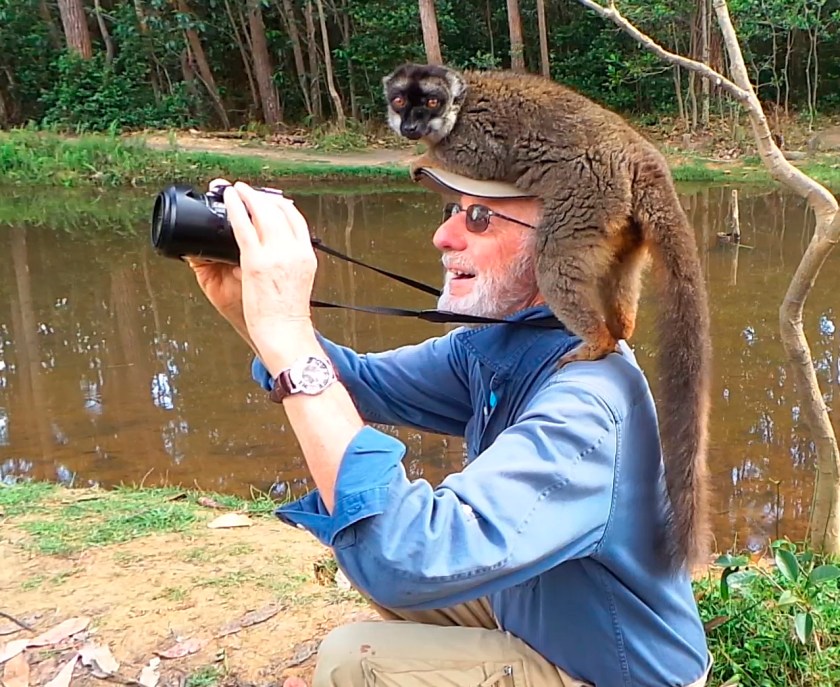
Last day…………..great fun. This part of the trip was way more fun and beautiful than we ever imagined. See you all soon…………cathy & jack

 Thanks to Alexandra Leask and Greg Pilsworth from Henry’s Kanata for their interesting presentation at our December meeting and for answering all our questions during the break.


 As you may know Catherine Easton (camera club slide show creator) and Jack Coutts are currently wandering around Africa. Catherine sent this
